
I may earn a commission when you buy through the links
on this blog.
Bookmark and stop back soon. Share this blog with your friends.
|
Follow us on
Facebook
Medicinal Garden Kit
|
Butternut Squash
|
|
This year was not an easy garden year .I planted the
butternut squash three times. The first time about half came up. The second time I panted
where the plants were missing and about half of them came up. Then the third time most of
them came up. I think the squirrels were eating the seeds. After that I just let what I
had grow.
By midsummer they looked like I had a good bunch of butternut squash plants growing. 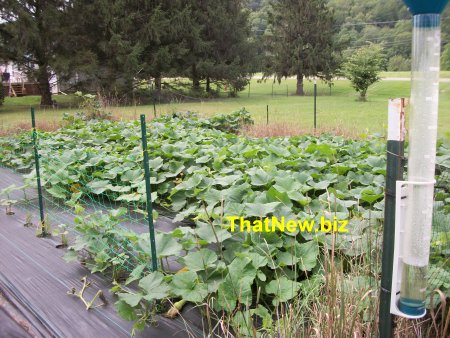
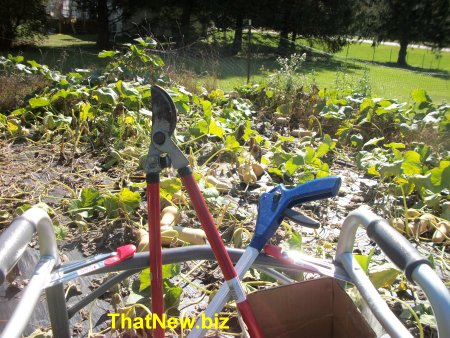
At the end of the season it was time to see how they did and harvest them. I used a long
handle lopping shears to cut them off and a grabber tool to pick them up. I could put 2 or
3 squash in a shopping bag and one in the box I have on my walker. After about 5 trips it
was time to call it a day. The vines getting caught in the walker and extra weight just
tired me out. After 3 days I finished and had 77 large butternut squash. Most weighed over
4 pounds. With one of the largest 6.4 pounds.
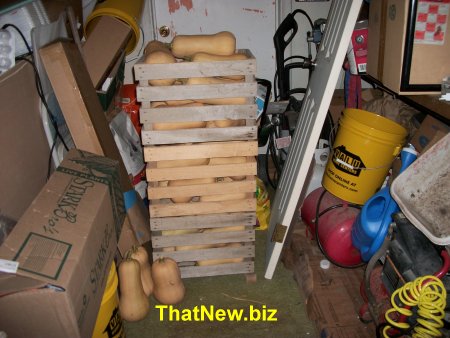
I gave several away to some of my friends to enjoy. The rest I put in crates until I get a
chance to cook and freeze them up.
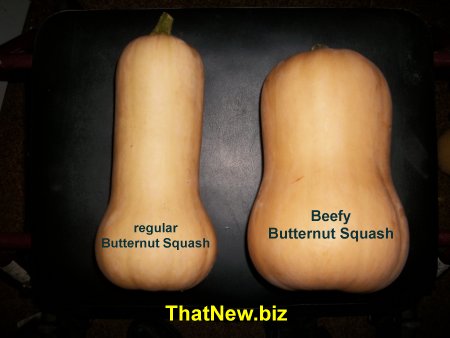
Last year I saved the seeds from a couple different butternut squash I grew. You can see
that on the blog pg1. I happened to have one
that was a lot fatter on the small end of the squash where most of the squash meat is. I
save the seeds from that squash and marked it as from fat squash. I planted about one
third of the squash with the seeds from that batch. In that area of the garden I had
several larger fatter squash. I was going to call the seeds from that batch Fat Boy
Butternut Squash. I was telling a friend about it and she said I should call them beefy
butternut squash. I think that sounds better. So when I save seeds from the larger squash
I will call them beefy butternut seeds.
Bats can eat their body weight in insects
Why not give them a home to live in.
Big Bat Box A great gift for any gardener.
|
Save tomato seeds
|
|
Did you save seeds from your tomatoes so you will have
them to plant next year?
Sometimes we are so busy at this time of year that we forget some things we need
to do. I forgot to save seeds from my brandywine tomatoes. I found one that was over ripe
that I put in my compost. I dug it out to get some seeds from it.
I cut it open with a knife and scooped some seeds out to put in a glass jar I had.
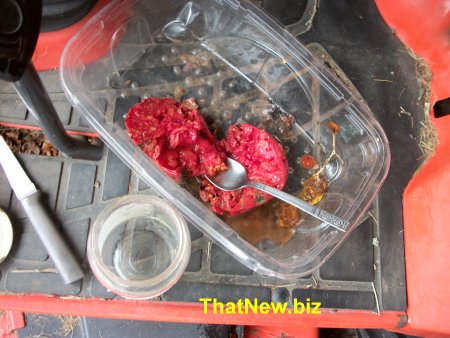
I let the seeds and pulp that came with the seeds sit in the jar for a week to let it
brake down some more. This brakes down the protective jelly like substance that keeps the
seed from germinating.

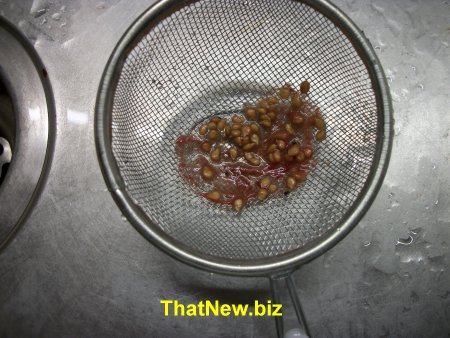
I then put the jar of seeds that I had in the jar and ran water in it for a bit. The good
seeds don’t float and the rest so the liquid will be washed out leaving the good
seeds. You don’t want the water flow to be to great as it will wash out the good
seeds.

Then dump the seeds in a strainer and rinse the rest of the leftover pulp out.
Dump the seeds on a paper towel and let them dry.
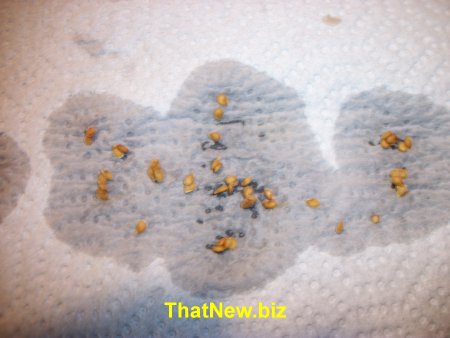
After a few days when the seeds are good and dry, I place them in an envelope. Lable the
envelope with the type of seed and the year you collected them. You should at some time
before you need to plant the seeds check to see if they will germinate. You can do this by
placing a few seeds in between a paper towel and keep it moist for a few days and check to
see if they sprout. You could place a few seeds in a small container of dirt and see if
they germinate. After that I write YES on the envelope with a date so I know I checked
them and when.
Medicinal Garden Kit
|
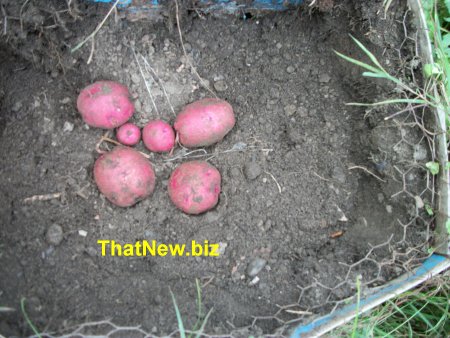
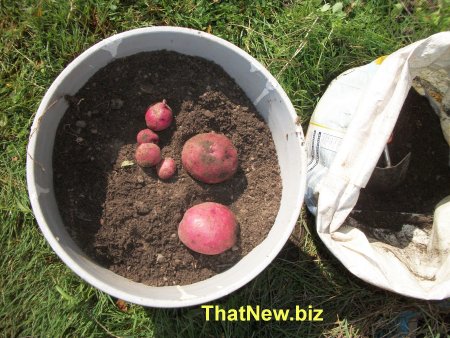
Box potatoes
|
|
Back on 6/9/23 I planted a potato in a box
the same time I planted one in a feed bag as posted on this blog. 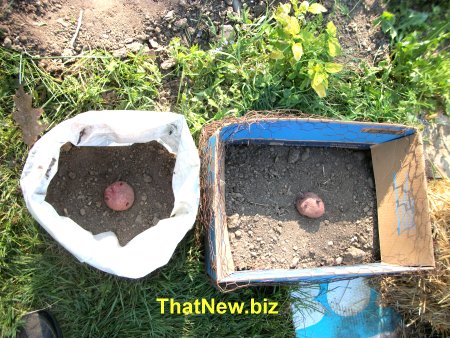
Just wanted to see how well it would grow that way. On 9/22/23 I went out to see how it
did. The potato plant was dead and time to harvest.
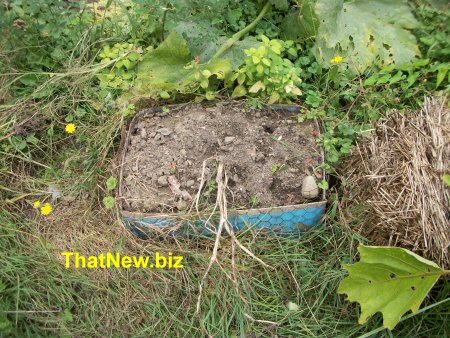
As I was digging the dirt out to get to the potatoes I noticed the dirt was dry. They did
better than the one in the bag because they could get moisture from the ground. I got 4
nice size potatoes and 2 very small ones.
Next year I will put in more potatoes to start with. I will also give it some fertilizer
as potatoes like a good amount of fertilizer and try to give them water if it is dry. That
should help bring in more potatoes.
The potato I used was an old red potato that was starting to sprout. I will try and find
some better potatoes to start with.
See the results of the potato I planted in a feed bag below in my blog. You can see where
I planted the potatoes on https://thatnew.biz/pg1.htm
E-Book Easy
cooking for beginners
|
Planting garlic
|
|
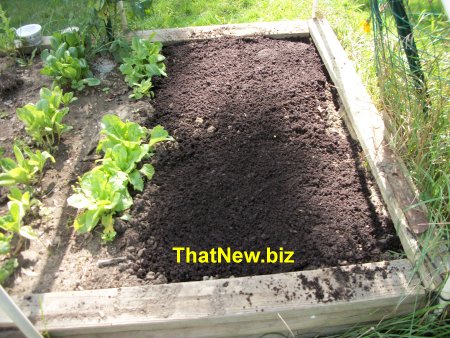
This is the time to plant garlic here in NY. Because it
gets cold for a long time. Hard neck garlic is the type that’s best to grow here. The
first thing I need to do is clean up the spot where I am going to plant it this year.
The next thing I do is add some worn castings to the area where I will be planting the
garlic.
Try and spread it out evenly.
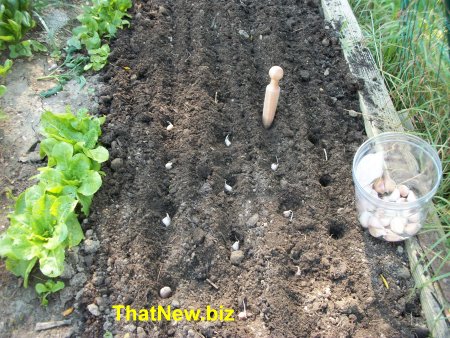
Get some of the largest bulbs you have to plant. The best bulbs I had from last year were
poor to say the least. I was talking to my friend Tom from Corning that is a great
gardener about garlic. He told me that he had a good crop and could give me some garlic
bulbs to plant. These are the beauties he gave me plant.

I broke one of the bulbs up in the photo so you could see how nice the cloves are that I
will be planting. Then I broke out the other bulbs to separate the cloves of garlic.
The next thing I did is mix in the worm casting and loosen the soil ready to plant the
Garlic. I marked the rows about 5 inches apart and used a dibbler to make the holes for
the garlic to be planted in about 3 inches deep. I off set each row to give them better
spacing.
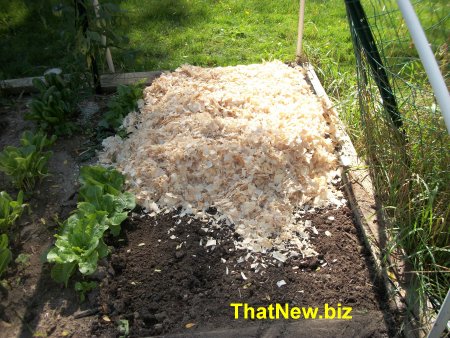
I covered the garlic clove with dirt about 1 inch deep. The last thing I need to do was
put some mulch over the top to insulate it from the cold. You can use straw or leaves to
do this. I had some pine shaving left over from when I had a few chickens. So I used the
pine shavings putting them on about 4 inches deep. I hope they will work just as good.
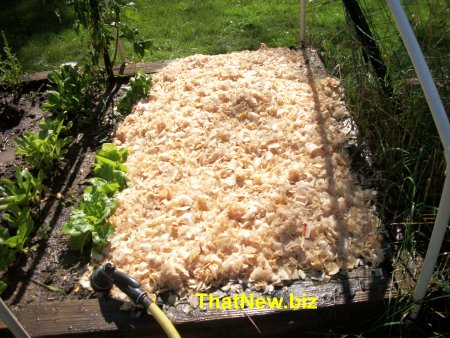
I wetted down the shavings and now until spring it will be up to GOD.
Hard neck garlic has a hard stem and is better for cold climates. Soft neck garlic is for
wormer climates and is often braded and hung to dry.
|
Eggplant fingerling |
|
This is the first time growing eggplant. The
seeds I got was for Eggplant fingerling. The plants grew well and had purple flowers with
several eggplant fruit. 
I didn’t know how to cook them. I cut them length ways and fried them in olive oil
with a little salt and pepper.

They were like healthy French fries cooked this way. I am sure you know a better way to
cook them. Next year I plan on growing regular size eggplant. There is a lot of recipes
for eggplant.
Fingerling eggplants are smaller and thinner versions of traditional eggplant varieties.
True to its name, the 'Little Finger' eggplant produces finger-sized eggplant fruit.
According to Cornell the fruit reach just 4 to 7 inches in length. They will yield several
tasty and nutritious crop of fingerling eggplants. They are at home in the garden and in a
patio containers.

|
Brandywine Tomato
|
|
The last of my Tomatoes that I planted was
the Brandywine Tomato. I only had a couple plants that I grew for fresh tomatoes for
sandwiches. 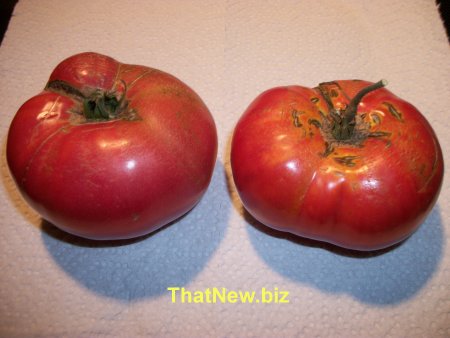
The Brandywine Tomato slice great for sandwiches because you only need one slice to cover
most of the standard size bread. They can also be used for canning.
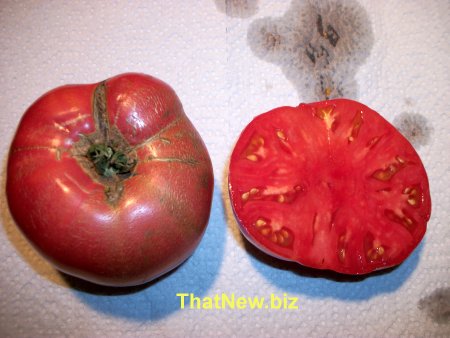
The Brandywine varieties are some of the most popular heirloom tomatoes grown in North
America. The Brandywine tomatoes are large, plump beefsteak like tomatoes with thin skin.
Brandywine tomatoes are full-bodied and non-acidic, with an excellent, robust tomato
flavor. The indeterminate plants produce high yields of the eight to twelve ounce fruit in
clusters of four to six along vigorous vines.
Automatic Irrigation System and
more |
Feed bag potatoes
|
|
Back on 6/9/23 I planted a potato in a feed
bag as posted on this blog.
Just wanted to see how well it would grow that way. On 9/12/23 I went out to see how it
did. The potato plant was dead and time to harvest. Because of all the weeds it was hard
to see what was left so I put a circle around it.

As I was digging the dirt out to get to the potatoes I noticed the dirt was very dry. I
had only put a couple holes in the bag to let water out if it rained too much. Potatoes
don’t like to sit in water. As you can see in the photo. I got 2 nice size potatoes
and 4 very small ones.
Next year I will put more holes in the bottom of the bag so they can get some moisture
from the ground if it is dry like it was in parts of this summer. I will also give it some
fertilizer as potatoes like a good amount of fertilizer. That should help bring in more
potatoes.
The potato I used was an old red potato that was starting to sprout.
Red Potatoes have a waxy texture, the flesh of red potatoes stays firm throughout the
cooking process, whether they are being roasted or cooked in a stew. Their thin red skin
adds appealing color and texture to side dishes and salads. Reds are frequently used to
make tender yet firm potato salad or add to soups and stews, as well as being served baked
or mashed.

|
Borghese Tomato
|
|
This tomato is a small plum-shaped variety
that grows to about 1 1/2 to 2.” Featuring a deep-red meaty flesh that is relatively
dry compared to other tomato varieties, this tomato is fantastic for sun-drying or
dehydrating.
The taste of this vibrant fruit has a classic rich tomato flavor that is great for making
tomato sauces. The Borghese tomato is famous for its excellent flavor and texture. When
dried, these tomatoes retain more flavor than most other varieties, so it is no surprise
they are a popular.
Here is my Borghese Tomato in my garden. The plants are loaded with tomatoes and are
starting to get ripe.
I saw a person tell that when a bunch of tomatoes grow in a cluster, it is best to pick
the full cluster when the first couple turn ripe. They said that if you pick only the
first couple ripe ones the energy would go to the next ones in the stem. They are will
often grow fast and split open. Then the bugs will start getting in the tomato splits and
spoil the tomato. By picking the full bunch you can let the green ones ripen inside
without splitting open. So that is what I am going to do.
I sorted out a bunch of the ripe tomatoes from the several bunches and left the green ones
to ripen.

I clean them cut off the top and cut them in half to dehydrate them.

It took over 18 hours to dehydrate this batch of tomatoes.
A good friend said that he roosted them in the oven at
275F for 2 and a half hours. Then put them in the freezer. I think I will try that next
time.
Time to stock up on canning
supplies before they run out. |
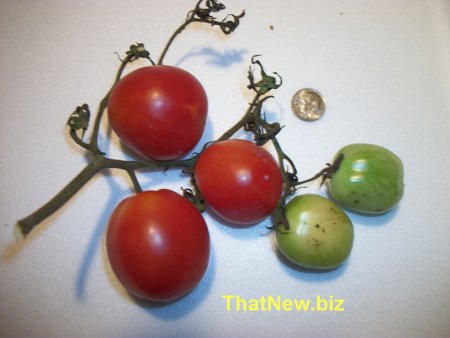
Currant Tomato
|
|
Currant Red tomatoes are very tart and sweet
tomatoes that grow in large clusters, resembling red currants. Due to their small size,
one popular use is to make sun-dried tomato raisins. Currant Red tomato is an
indeterminate tomato crop producing fruit throughout the season.
As I showed you when I planted the Currant tomato plant it was very long. 
This is one of my favorite tomato plants because it produces hundreds of tasty tomatoes to
snack on when I go out and work my garden.
Just one plant can grow in to a large bush of these tasty tomatoes.
The clusters start with the first tomatoes ripening first then keep ripening down the stem
every few days. They are smaller in size than cherry tomatoes.
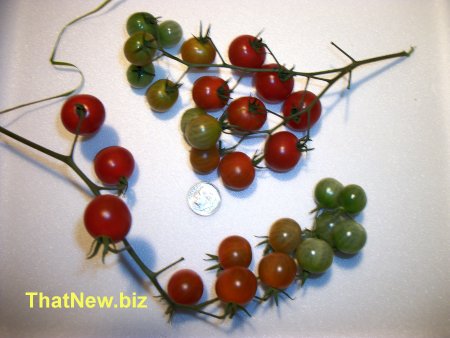
They are an easy plant to save some of the seeds and plant them again next year.
This
free PDF will teach you how to Unlock Your Wealth DNA
|
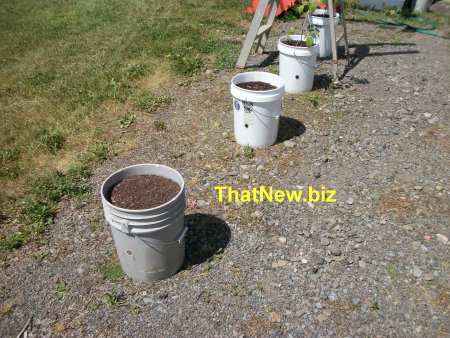
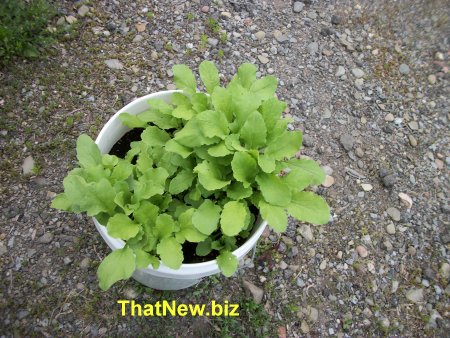
Beet Greens
|
|
This year I planted some beets and radishes
in 5 gallon buckets. I just sprinkling some seeds on the top of the buckets and worked
them in to the soil a bit. 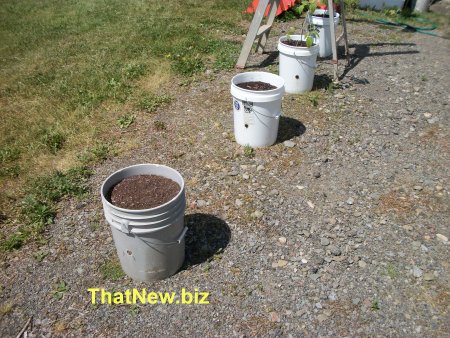
The beets started to grow with some spots heavy.
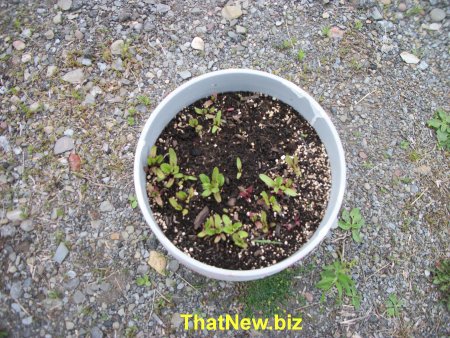
When the beets got bigger I had to thin them out. This gave me enough beet greens for a
meal. I just washed them off.

I just took a pan of boiling water and put the greens in the pan. When the leaves and
stems got tender, they were done.
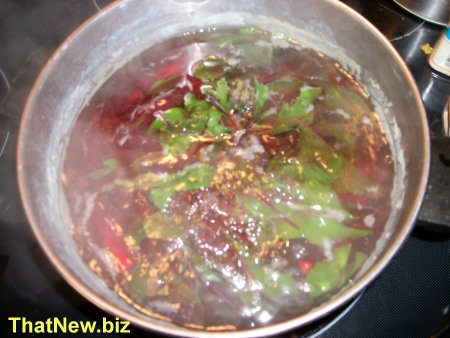
I just added a small amount of vinegar to them in a bowl to eat them.
Beet greens are the leaves that grow on beets. They packed
with nutrition. The greens, stems and tiny beets have a mild, sweet, and slightly earthy
flavor. They can be used in many of the same ways as kale, but they're less bitter.
|
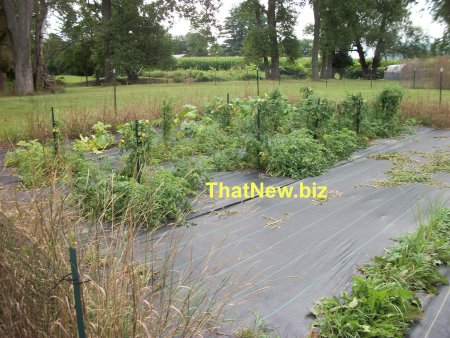
Straw Bale update
|
|
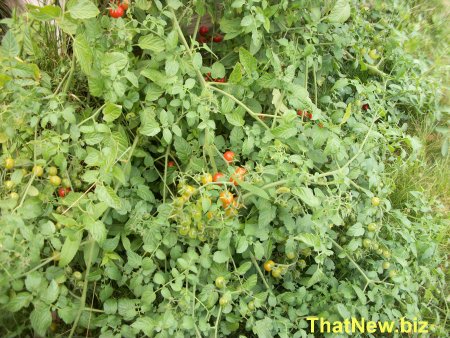
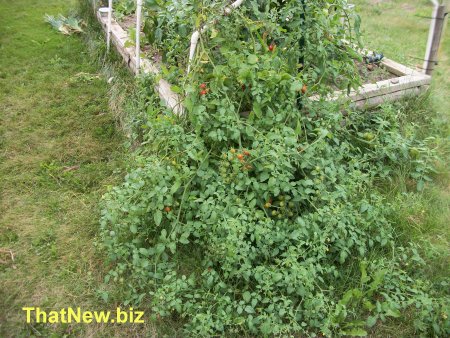
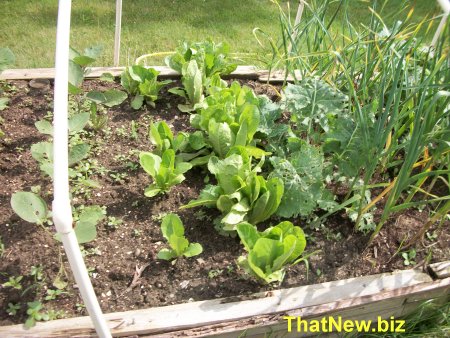
This is an update on how my Straw bale garden
is doing. I planted the smaller leftover plants I had from my raised bed garden. The
eggplant is doing better than the ones in the raised bed garden.
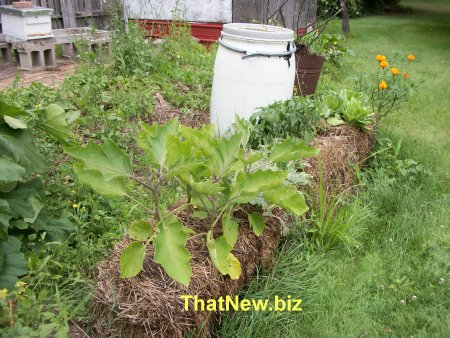
The Pak choi is not doing so well. For some reason the bugs just overtook the Pak choi as
fast. I didn’t have time to catch it before they were almost gone.
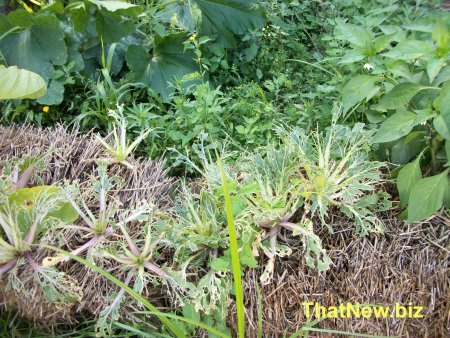
I only had a couple jalapeno peppers left after the frost killed my first planting. They
are doing as good if not just a bit better than the ones in my raised bed.
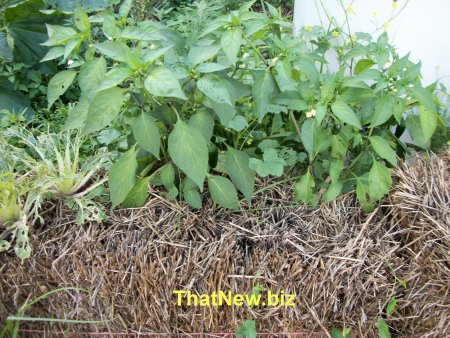
The romaine lettuce did well and so did the marigold followers. So far Straw bale garden
looks like it is doing well.
|
Swiss Chard
|
|
Time to harvest some Swiss chard: A
Nutritious and Versatile Green. 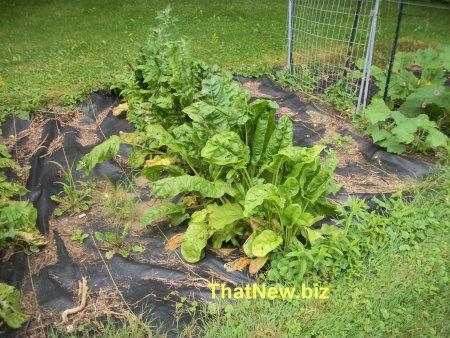
Swiss chard is a leafy vegetable that belongs to the same family as beets and spinach.
I cut the larger Swiss chard leafs and put them in a box leaving the smaller leafs to
grow.
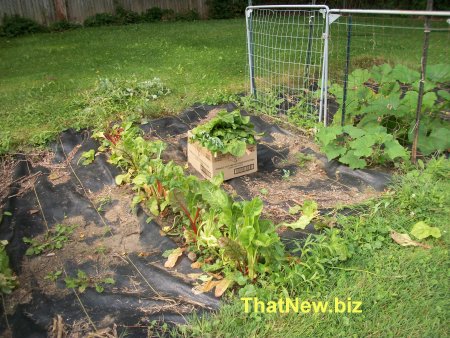
I sort out all the bad Swiss chard leafs. I then wash off the Swiss chard leafs in the
sink.
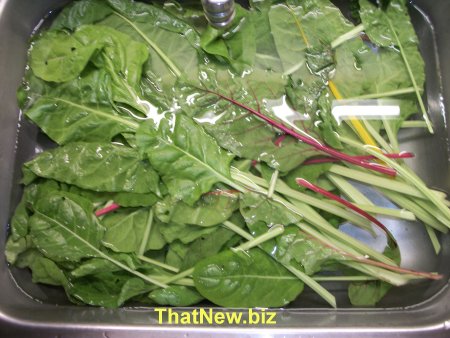
Then I chop them up.

Take a pan of water and bring it to a boil. Then put the chopped up Swiss chard leafs in
the boiling water for just a short time.

I then scoop it out and put it in freezer containers.

I put it in the freezer to enjoy over winter.
E-Book Easy
cooking for beginners
|
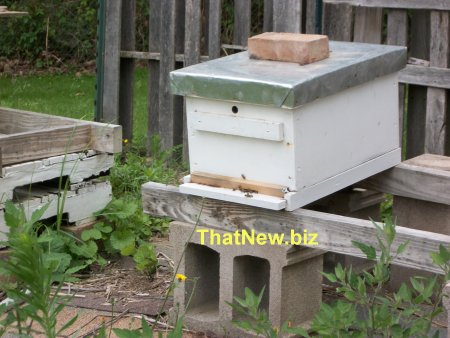
Bee Swarm
|
|
I lost all my bees to yellow jackets weakening the hives and wax moth finishing them off
in the 2 years I was unable to take care of them. Last year I was hoping to catch a swarm
of bees so I would at least have one hive of bees. Because I was still having trouble
getting around outside I didn’t see any swarms. So this year I was keeping an eye out
for a swarm that I could get. On July 11th when I was closing some windows I noticed that
there was a swarm on the telephone pole that was between my place and my neighbor. 
I went out to take a closer look. Because the ground was ruff and hard to get there with
my walker. I would need help to get them. I decided that if they were still there in the
morning I would see If I could get my next door neighbor to help. My next door neighbor
Anthony who wanted to learn about bee keeping . By the time I was getting ready to call
Anthony I check to make sure they were still there but they had already left.
On July 13th my neighbor Sue out back called and said there was a bunch of bees on her
mail box and Tom could help me bring my swarm box out so I could get them. I scooped up a
bunch of the bees using the bee frames and put them in the box. After getting a couple
frames in the box. The rest of the bees started leaving the mail box and going in to my
swarm box. I was going to let them settle in overnight and see If Anthony could give me a
hand moving the box out back where I keep my bees. He said he would come Saturday the 15th
early in the morning and move them for me. I have had good luck moving the bee swarms
early in the morning before they start flying for the day.
On the 14th in the afternoon I found that the bees
didn’t like their new home and left. That was disappointing. I left Anthony a voice
mail saying he didn’t need to come early to move the bees. Later that day Sue call
and left me a voice mail saying there was a swarm in her oak tree in her front yard. I
went and looked and there was a swarm about the same size that was on the mail box. It was
getting late in the evening. Tom helped get my steep ladder and a different swarm box. Sue
and Tom put the ladder a swarm box close the bees hoping they might just go in the box. I
called Anthony and told him what was going on and he said he would be here early Saturday
morning to help get the swarm.
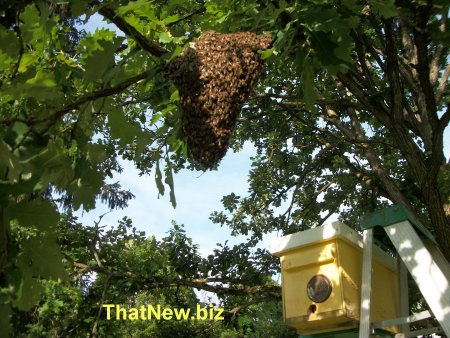
The swarm was still on the branch so we both suited up to go get the swarm. He climbed up
the ladder and I told him to take out a couple frames and try to scoop up under the bees
and put them in the box. That didn’t work very well because there was a branch
hinging down that the bees were on. I told him to hold the box under the bunch of bees. I
reached up with my reacher and gave the branch a good sharp shake. A bunch of bees landed
on the box and some fell to the ground. I told him to put the box back on the ladder and
slowly put the top back on the box. We watch the bees for a short time and it looked like
they were starting to go in the box.We went inside a visited for a while to let the bees
settle down. Then we went back out to check on how the bees were doing. All the bees where
off the branch with a few flying around. I asked Anthony to take the box and set it next
to the hive body that I would move them in to in a few days if they stayed.

The following Saturday I went out and moved the bees into the hive body. I looked to see
if I could find the queen or at least some eggs or larva. The bees were getting a little
worked up so I just got them moved and didn’t see any queen, eggs or larva.
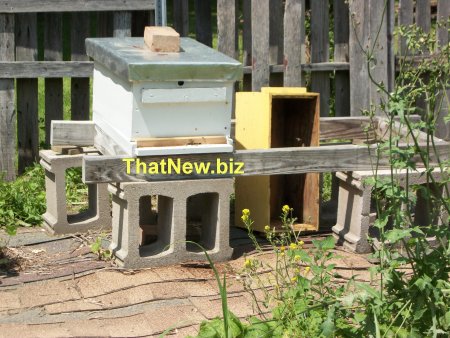
The following Sunday I went out and checked the bees. I found that they already had 3
frames of caped brood. This made me very happy that I finally got a bunch of bees. Thanks
to Anthony, Sue and Tom. I will have to keep an eye on them to make sure the keep doing
fine.
|
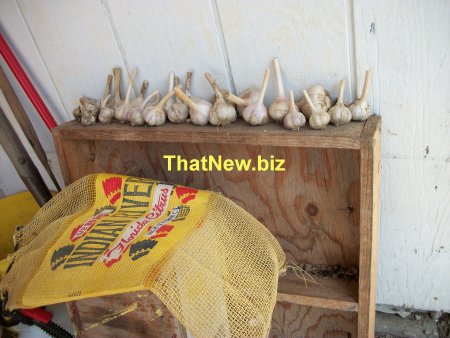
Garlic
|
|
I dug up one of my garlic plants just to see
how they were doing. It was a good thing because they were too wet and starting to
resprout. I knew I had to dig the rest up fast if I didn’t want to lose all my
garlic. 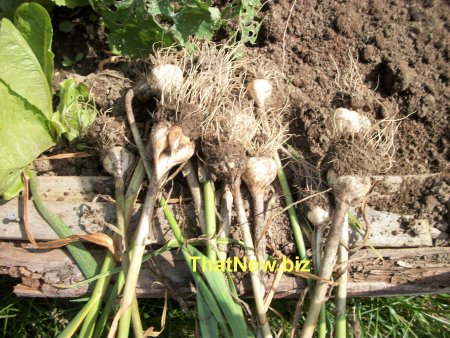
I shook all the dirt I could off then laid them out to dry.
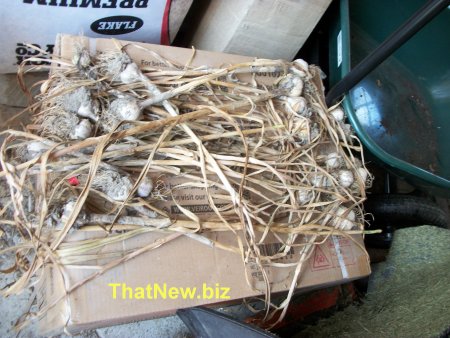
After about a week of drying I needed to clean them up and get ready to store. I used my
garden shears to clean them up.
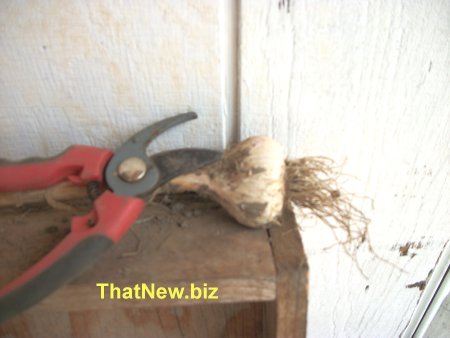
I cut the stem off and left about 2 inches off the stem. Then I take all the roots off the
bottom.

Here is what I got left after cleaning them up. I will put them in the mesh storage bag to
let them dry some more. I will hang the bag up and take the garlic out of the bag as I use
them.
Time to stock up on canning
supplies before they run out.
|
Saving Kale Seeds
|
|
As I mention in my cleanup blog. I had a few Kale plants that survived the winter. 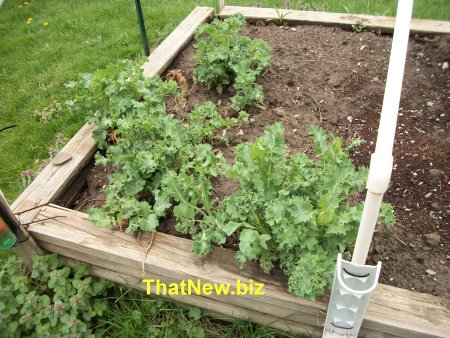
I was able to get a few kale greens early this spring. As it got hotter out these kale
Plants began to bolt and have yellow flowers. I keep a few of these plants to let them go
to seed.
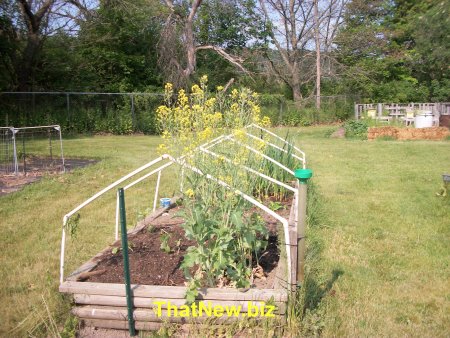
They will develop in to seed pods.
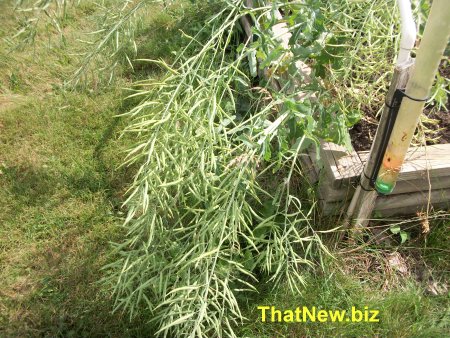
When the pods started to turn brown I cut the plants down and hung them up to dry.When
they were dry and a few of the pods already started to pop open. I put them in a bucket.
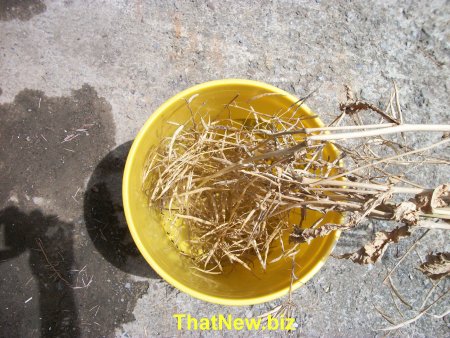
I ran my hand up and down the branches giving them a slight squeeze to release the pods in
to the bucket.
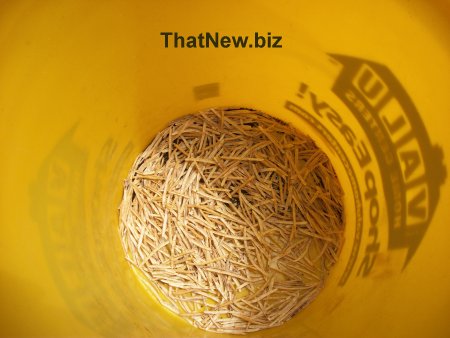
I then picked up a hand full of pods at a time and rubbed them lightly to release the
seeds from the pods. Letting the seeds fall in to the bucket and throwing the empty pods
away leaving the seeds in the bucket.
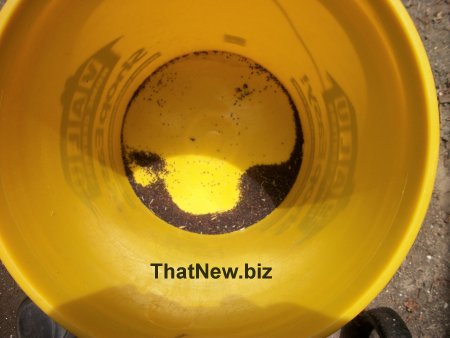
With a light breeze I poured the seeds in a smaller container letting the wind blow away
the small pieces of pod.
I will let the seeds dry some more then put them in a paper envelope, mark them with the
type seed and year. Before planting them next year I will test the seeds to make sure they
will germinate and make that they are good seeds.
Kale is a good plant to have your kids save the seeds because it is easy and a fun project
for them.
If you have a children's garden, be sure to have them plant kale one spring and harvest
the seed in the summer or fall of the following year.
IF you are going to save seeds from your kale it is best to not have any broccoli,
cauliflower, cabbage, collards, kohlrabi or brussels sprouts nearby to avoid unwanted
cross pollinating.
Some people save seeds to sell to earn extra money.
|
Farm Fresh Lettuce
|
|
I like to have farm fresh lettuce so I grow some romaine lettuce
in my garden. I plant a few lettuce seeds inside to get an early
start on being able to start harvesting it early.

I plant the seedling about 8 inches apart. I then spread a few seeds in the
row between the seedlings.

I grow the romaine type of lettuce because I have had the best luck with that
type. Lettuce is a cool season crop; it thrives when temperatures are between 60? and 70?.
Hot weather often causes lettuce to bolt and/or become bitter. There are some varieties
that growing in warm climates and some that will grow when it gets quite cold. It is best
if you water them in the morning and if you can do not water over the leaves for best
results. Lettuce has a shallow root system and requires frequent watering. Dry conditions
cause lettuce to become bitter and/or bolt. To avoid problems with disease, try not to get
water on the leaves when watering. Water the lettuce in the morning if possible. I harvest
the entire plant, cut off with scissors � inch above the soil line when thinning out
the smaller plants.
Then I use the cut and come again method when they get bigger. Harvest outer
leaves as needed and allow them to grow for future harvests.
You can also grow lettuce in containers or hydroponically.
A better way would be. Grow Plants Abundantly with
AQUA-PONICS
|
Farm Fresh Radish
|
|
How to have farm fresh radishes at home. This
year I planted radish and beets in my 5 gallon buckets about the same time I planted the
tomato plants in buckets.
I just scattered the seeds on the top of the bucket and ran my fingers around on the soil
to work them in a bit. When I was watering them, the seeds were pushed to the sides of the
bucket causing them to bunch up. Next time I do this I will use a lighter spray.
I needed to thin out the radishes so I started pulling out the biggest ones even though
they were small. They were about the size of my little finger or smaller but they were
still tasty.

Just a couple days later, some were bigger so I picked them along with some lettuce for a
salad.

I am going to sprincle a few seeds in the bucket every time I harvist some
radishes. I am hoping this will keep me getting fresh radishes all summer.
When you think of a radish you most likely imagine the root vegetable that's small, round,
red, and tangy. Most radishes fit this description, while radishes can be round or oblong;
hot or mild; red, pink, purple, white, or bicolor. Radishes have fast growth rates, with
some varieties ready in 30 days
For me I found that I like the French breakfast radish so that is what I
grow. I like this smaller, oblong variety of radish for its mild, softer flavor compared
to traditional radishes, and the beautiful white and pink colors. The radish skin is thin
and smooth, with a crunchy, tender bite.
Radishes are a good source of antioxidants like catechin, pyrogallol, vanillic acid, and
other phenolic compounds. These root vegetables also have a good amount of vitamin C,
which acts as an antioxidant to protect your cells from damage. Radishes also contain
coenzyme Q10, an antioxidant that helps block the formation of diabetes.
Back to ThatNew.biz
For more post from 12/9/22 to 6/30/23 go to https://thatnew.biz/pg1.htm
|
|
I am 68 years old and have been doing websites for over 25
years. My first website is WESTNY.com . I had a website
business GLASSMARBLES.com for about 22 years. I had to stop that business because of my
health. I have to use a walker to get around so I am limited to what I can do. I am doing
a blog on this site THATNEW.biz. I am going to use this because I already own THATNEW.biz
and going to use it as a blog. I use to do gardening, keep bees, building things and other
things. This will give me something to do to keep my mind active. I hope this will give
you insight to what older people like to do. 12/12/2022 |
|
|
Bookmark and stop back soon. Share this blog
with your friends.
|